Author: Fei Ren (Page 4 of 6)

Celebration Day – Last Day with U-M Mentors!

It’s hard to believe that it’s April 17, and this is our last day with our U-M mentors. Some of them are getting ready to graduate, and all of them are preparing their final projects and presentations.

To celebrate the end of a jam-packed year of learning and making, we’re hosting a celebration today. Families, district leaders, and some U-M friends will be joining us as each of us (mentors, too!) shows off something he or she is proud to have made this year, either at home or at Michigan Makers.

I won’t spill the beans, but I can say that here are some of the things piled up on my desk or in my car to bring out to East today: play dough, photos, manuscripts, a mystery box, something we never quite got to work, and a camera.

Last week, everyone was working hard to get something ready to share. We had so much fun seeing you guys at work. There was an amazing productive vibe in the room, and we realized how much everyone had learned about focus, applying their skills, and working with peers.

We hope to see you there. If you can’t make it, check out our Flickr feed in a few days to see what you missed, or take a look at the video below to catch a glimpse of what we worked on first semester!

– Kristin

Sewing, Video, Scratch, and Raspberry Pi!

We had another busy day of Michigan Makers! Sewing machines were whirring, kids were coding with Scratch, we unpacked our new monitors and faced weird new challenges with Raspberry Pi, and a student video crew gathered footage for an upcoming project!

The Michigan Makers tackling sewing had a lot of questions about how sewing machines work. UMSI mentor Kelsey found a cool video that shows how stitches are made. Check it out below!

We were glad to have Maya’s dad, Mr. M., helping out again, this time with formatting a Raspberry Pi and assembling it. It is an awesome feeling to see the big raspberry icon on your screen, because it means you did it — and it takes most of the 90 minutes to do it! Do you know why Raspberry Pis have green circuit boards? What it means when your Raspberry Pi boots up and shows you a # sign and not a $ sign or a desktop? Ask Mr. M.!

We also took a mockup of the Fall 2013 book Raspberry Pi for a test drive … hmmm … we think we found a mistake in it. Good thing we can catch that before it goes to print!

We added the photo below to our Flickr photo stream. Want to see what else Michigan Makers were working on today? You’ll have to wait for the video team to work its magic!

– Kristin

Success! RasPi booted!
Raspberry-Pi-Book-Cover-Tentative

Congratulations, Mrs. Goldberg!

Have you ever wondered why Mrs. Goldberg wanted Michigan Makers to get started? Hop over to the web version of Young Adult Library Services magazine to read her article!

The article also includes a version of our Follett Challenge video. Haven’t seen it? Click below!

Congratulations, Mrs. G!

– Kristin

Sewing 101

Special shout-out to our new grad student mentor, Kelsey, who jumped right into her first day by helping with this activity!

Our first day of sewing was a huge success! The day was a bit more structured than some of the other activities we’ve been doing, in order to make sure the makers understand both the safety measures necessary and the operational basics for using our sewing machines. We started out with a threading demonstration, and then the makers worked in pairs to thread the rest of the machines. This buddy system worked well throughout the day– an extra pair of eyes watching that needle never hurts! After another brief demonstration of how to actually use the machines, the makers took turns practicing on some scrap material. Favorite feature so far: the reverse function.

Then it was time for the makers to think about their first project: a pillow in a shape of their choosing, but with a few specific elements included: a straight line, a curve, and an angle. Most of the kids incorporated these elements into the outside shape of their pillows, but Vincent is making a rectangular pillow and using the machine to create a curvy, embroidered design on the front side. We got as far as patterns and pinning, and hope to finish up by the end of next week’s meeting.

It was fascinating to watch how quickly the makers took to these machines. Within a matter of minutes, the kids quickly figured out how much pressure to apply to the foot pedals, how to use their hands to guide, not pull, the fabric through, and what “bad” pulling felt like if the thread knotted up. Everyone got a turn at the machines, with their partners (and Kelsey and I) watching closely to monitor things like hand placement, speed, and needle and presser foot starting position. The makers showed that they understand the safety concerns of the sewing machines and take them just as seriously as we do. We’re excited to see how everyone’s projects turn out next week, and to start exploring other projects to make with these machines!

-Jessica

Updates from the Field

We had a very exciting week at Michigan Makers this week, with lots of great things going on. We added a new mentor this week, welcoming Kelsey to our midst; we also had a past Michigan Maker back for a visit this week; and we even had a special guest visitor (but you’ll have to read the whole post to find out more about him!). Keep reading to hear about the highlights from our day.
Picture

Demonstration of the Arduino+MP3 project in action. Although you can’t tell from a picture, the LEDs are groovin’ to the beat!
Activities at Michigan Makers this week:

  • Arduino 101 – Many of the Michigan Makers have already spent some time learning and exploring with the Arduino, but this week was another chance to bring some new folks into the fold. Terence and Caroline headed to the lab–it seems like they had a grand old time learning about this terrific tiny tech tool.
  • Arduino + MP3 Project – Speaking of Arduino, we had a few of students in the group working with a couple of mentors on a particular Arduino project. The group originally consisted of two dedicated makers, but this week, they added three more friends and continued troubleshooting their project. The goal? To get LEDs, controlled by an Arduino, to blink in time to the music of an MP3 file. Pretty awesome stuff, and they got it working today and did a demo for the whole group.
  • Scratch and the STEM Video Game Challenge – Another group of students seems pretty excited about making their own games, specifically video games. The group started learning about Scratch (the interactive programming environment from MIT) last week, and several students wanted to continue their explorations. Another few students wanted to use their own images as sprites, so they got out the green screen to stage their photo shoot.
  • Sewing 101 – And, our final activity was new for this week! We were pretty excited to get access to some used sewing machines and, with a little bit of work on Jessica’s part, we got them up and running and ready for the Makers! This week a group of students learned some sewing basics and started designing projects (to be continued next week).

Shout-Outs!

  • We gave Vincent a leadership badge this week in recognition of his boat-building challenge from a few weeks back. He showed some real initiative in approaching us with an idea, designing the challenge, and leading a group of his peers through the activity. We also introduced the option for students to design and develop their own badges, and I know a few form went out to eager folks.
  • Maya’s dad, Curt, was our special guest for the day. He and Maya gave a brief demonstration of the new Raspberry Pi cases they made for us–super awesome! You can check out the video of their making in action on the Michigan Makers Flickr account here. He also stayed for the day and offered some great expert support on the Arduino!
  • Finally, as already mentioned, Jacob and Justin demonstrated their Arduino+MP3 project in action, to the awe and encouragement of their peers. Erik also got the project up and running, so gave a demo of his blinking LEDs too. Congratulations to the three of them–and to Victoria and Shauna, who offered mentor support all along the way–great work!

Come back again soon to see what’s happening and what’s new at Michigan Makers!

–Ellen

Michigan Makers – now on Flickr!

Can you tell it is spring break and the Michigan Makers are catching up? We have a lot of people who are asking about the photos we take in our makerspace, so we’ve started a Flickr account so you can download the photos and video you like best.

Check out the slideshow of video and photos below or visit the Flickr account here.

– Kristin

Raspberry Pi!

Hi, everyone! The last time we met, we finally got to fire up the Raspberry Pi computers! The fun part about Raspberry Pi is that you do all the work to put it together. You download the operating system, put the pieces together, and go from a pile of components into a functional computer!

If you want to try this at home, we used BerryBoot to get started.

We also got to test-drive the forthcoming Raspberry Pi book … stay tuned … we have news about that, too, for when we see you next!

– Kristin


Laser Cutting at Dearborn’s Tech Shop

Hi, Michigan Makers! It’s been a while since we’ve seen you. First you had winter break, then we had a snow day, and this week, the UM team is on winter break!

What did you do over spring break? Maya and her dad hung out at Dearborn’s Tech Shop and laser-cut cases for our Raspberry Pis. Check out the video below. Eventually, we can peel off the protective brown paper to reveal clear acrylic underneath.

We can’t wait to see you again on the 13th. Wait until you see what new equipment we’ll be unveiling! It’s not what you might expect …

– Kristin

Maya and Her Dad Laser Cutting RasPi Cases IMG_2375

Arduino Workshop One

Picture

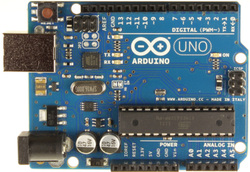
Arduino (pronounced Ar-dwee-no) is the name of a tiny micro-controller that allows people to become more comfortable with basic computer programming and hardware. For our last Michigan Makers workshop of the Fall 2012 semester, the Michigan Makers group worked with these awesome gadgets for the first time. Arduino is great because it’s simple enough that East’s sixth graders can grasp the basics, but it is also flexible and powerful enough to be used by professional programmers, designers, and robotics technicians.

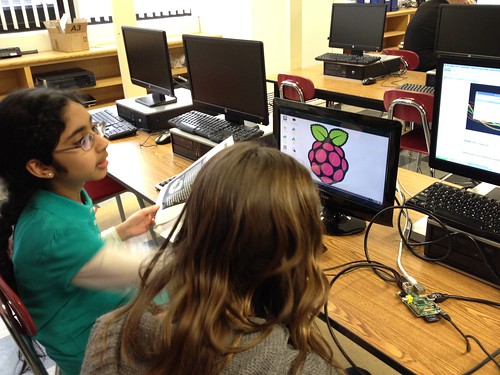
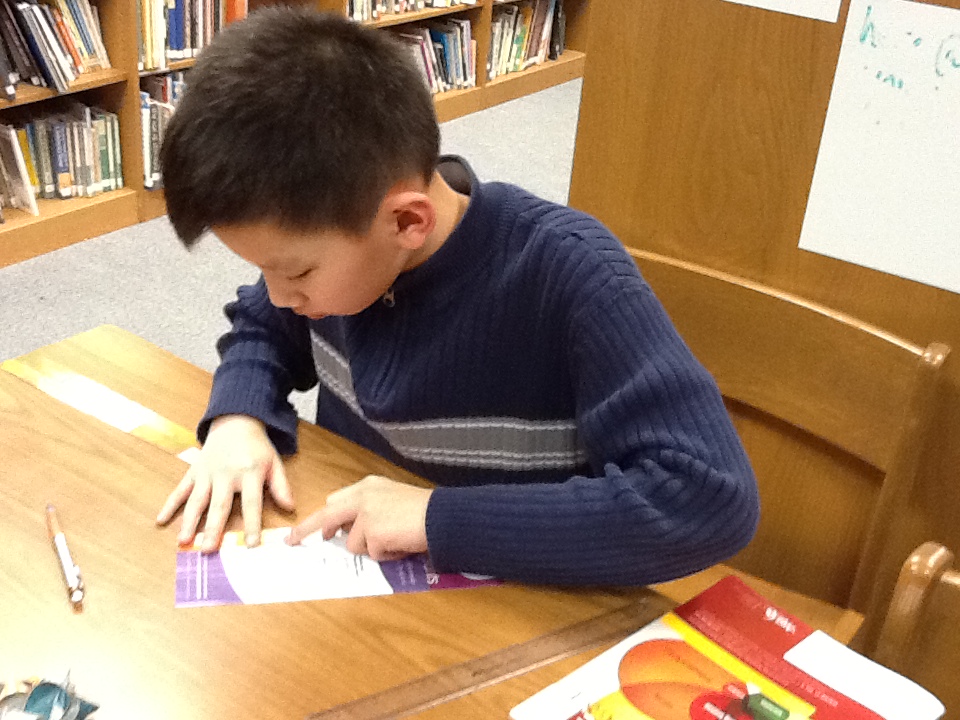
For this first Arduino lesson, we introduced the hardware—the Arduino looks like a circuit board about the size of a deck of cards. The students recounted what they knew about circuits, conductors, and resistance, which they learned about in our Squishy Circuits workshop earlier in the year. Over half the group was able to raise their hands and build off of others’ contributions, showing me they already knew a good deal about how electricity moves and works. This knowledge would soon help them to make sense of why they needed to give the electricity someplace to flow through and to.

After talking a bit more about what people use Arduino for, including the Peruvian boy who set up an automated earthquake alarm system, we set the kids to attempting to unpack what swatches of code are designed to do. Working in pairs and always building off of each other’s thoughts and ideas, they tried to make sense out the previously forbidden territory of computer code.

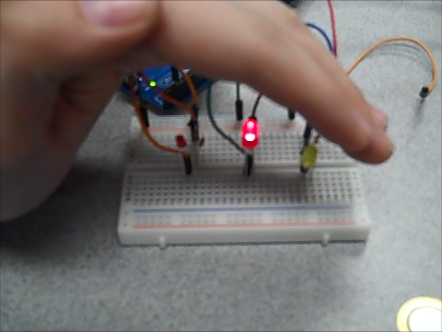
The students uploaded a program that controlled when an LED light bulb, or light bulbs, blinked. They then altered the code so that the lights blinked at different times. Twenty minutes after looking at it for the first time, they were already controlling both the code and a strange, light emitting machine!

Our last challenge was for the pairs of students to cut and paste a chunk of code from the internet into the code that they had been working with. This was bit a tougher, because the students had to pay close attention to how the code fit together to make the lights blink.

After we finished, the students excitedly shared with others what they’d learned. It was particularly exciting to feel like they were coding and using a robot—something they hadn’t considered possible before.

The lesson was successful partly because we have a great place to work in at the school’s library, partly because the Arduino is such cool technology, but especially because of our big kid coaches, the ninth graders that are expert in Arduino and were so great at helping troubleshoot, help kids understand things, and even bringing in their own Arduino projects to show off. It is incredible to see all of the kids get so excited about this technology, because there are so many possibilities for applying the knowledge they are building.

These upcoming weeks, we’ll introduce Arduino to the other half of the group, but we’ll also give the students more time to work, incorporating sensors, buzzers, and more cool stuff for our young Makers to control.
-Terence

Gift Bows and Wrapping Challenge

The Michigan Makers have had several activities to choose from for the past few sessions. The big hit from a couple weeks ago was a hands-on, low-tech, craft project: making gift bows out of magazine pages and wrapping gifts, with a wrapping challenge issued for strangely-shaped objects.

We demonstrated the procedure for making the bows, which involves cutting a magazine page into strips of different lengths, twisting the strips, and layering them. Then it was time for the Makers to create their own from a pile of old magazines. They quickly discovered that brightly colored and boldly patterned pages make for the most interesting bows. While this activity takes a bit of time (especially when several kids are sharing just a couple of glue sticks), we noticed that the Makers were able to use this time to converse and get to know each other. Some groups shared insights as to how to twist the strips “just right,” and others just chatted about school and their weekend plans. And that’s a big part of makerspaces– sharing, collaborating, and hanging out as a community.

The Makers came back together as one group and we demonstrated some “best practices” for wrapping presents, using a simple box for the example. Then we issued a wrapping challenge. The kids could choose to wrap a regular box, cylindrical tubes, a stapler, a closed-up umbrella, or a woven straw cornucopia basket (naturally, this was the most highly-coveted object). The Makers practiced their geometry skills in deciding how much paper they might need, and practiced their problem-solving skills when they started wrapping with too much paper. All of the objects got wrapped successfully, and we discussed the challenges of wrapping objects without any right angles.

It was great to see how well the kids responded to a low-tech activity, and to see how they are broadening their perspectives of what a makerspace can be!

-Jessica

Picture

Picture

Page 4 of 6

Images © 2015 Regents of the University of Michigan. Text available under Creative Commons Attribution-NonCommercial-ShareAlike license unless otherwise stated. This project was made possible in part by the Institute of​ ​Museum and Library Services RE-05-15-0021-15.